> For the complete documentation index, see [llms.txt](https://docs.snyk.io/llms.txt). Markdown versions of documentation pages are available by appending `.md` to page URLs; this page is available as [Markdown](https://docs.snyk.io/developer-tools/integrations/snyk-ide-plugins-and-extensions/visual-studio-extension/authentication-for-visual-studio-extension.md).
# Authentication for Visual Studio extension
How to authenticate the Snyk Visual Studio extension, including the supported protocols
{% hint style="info" %}
**Snyk is rolling out a new navigation.** The steps on this page describe the classic interface. If your view looks different, visit [Navigate the Snyk Web UI](https://docs.snyk.io/navigate-the-snyk-web-ui#where-things-moved) to map these options to the new interface.
{% endhint %}
## Authentication for Visual Studio extension
To scan your Projects, you must authenticate with Snyk.
Snyk supports the following protocols for authentication:
* OAuth 2.0 (Recommended)
* Personal Access Token
* API token (Legacy)
Authentication methods available in the Snyk extension in Visual Studio
### Steps to authenticate using the OAuth 2.0 protocol
Follow the next steps to authenticate:
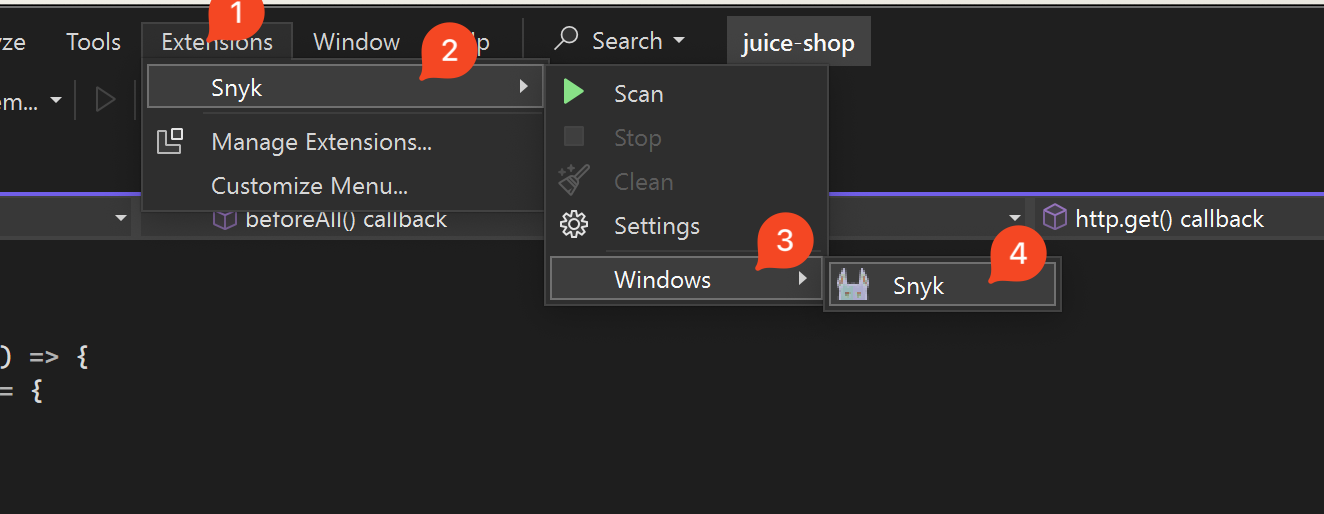
1. After the extension is installed, navigate to **Extensions** > **Snyk** > **Windows**, and then **Snyk** to open the Snyk panel.
Snyk extension navigation
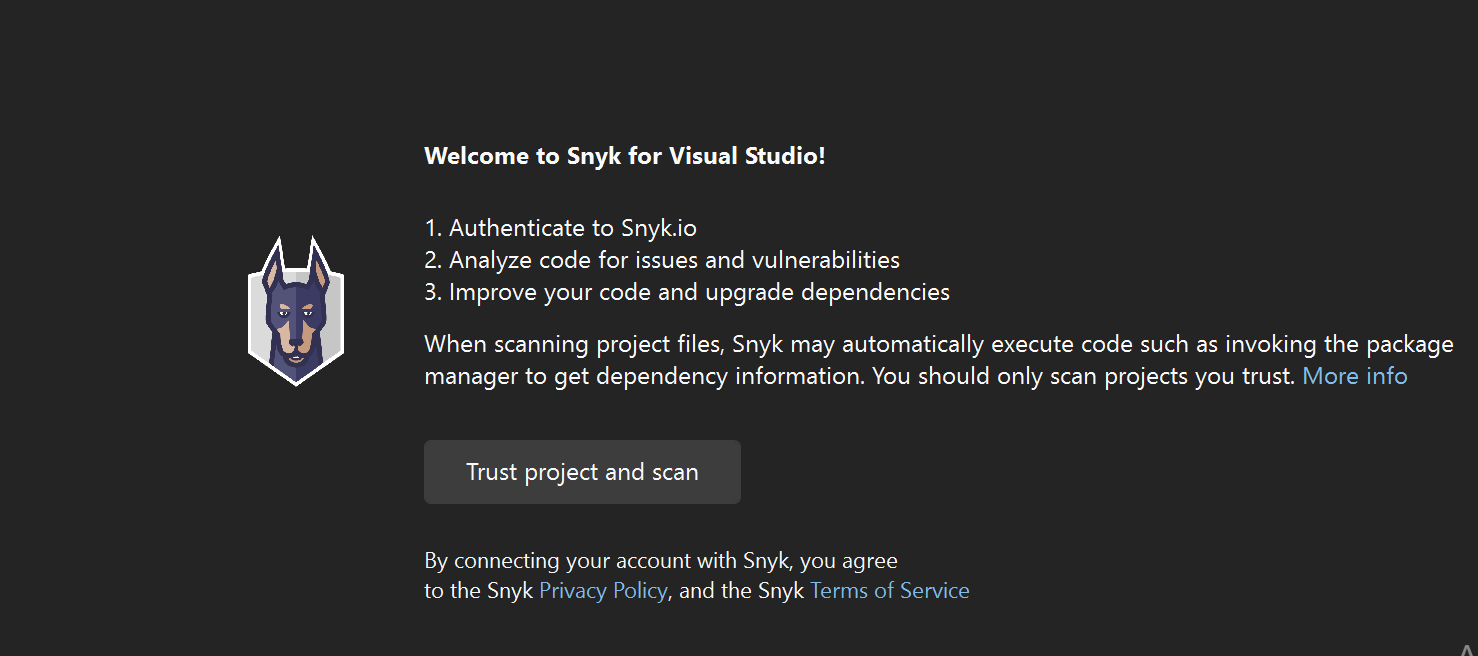
2. On the welcome screen, click **Trust project and scan**.
Trust project and scan
3. A new browser window opens, requiring you to log in to your Snyk account.
4. In the next prompt, the Snyk IDE extension requests access to act on your behalf. Click **Grant app access**.
5. When you have authenticated successfully, a confirmation message appears. Close the browser window and return to the IDE.
The analysis starts automatically. The IDE reads and saves the authentication on your local machine.
{% hint style="info" %}
You might encounter the browser redirecting to 127.0.0.1:8080. This is normal, and you would need to retry the steps above.
{% endhint %}
{% hint style="info" %}
OAuth 2.0 tokens are not static and cannot be copied from the Snyk account page.
{% endhint %}
If you have problems, see [OAuth 2.0 authentication does not work](/developer-tools/integrations/snyk-ide-plugins-and-extensions/troubleshooting-ides/how-to-set-environment-variables-by-operating-system-os-for-ides-and-cli-1.md).
### Steps to authenticate using your Personal Access Token
{% hint style="info" %}
Snyk recommends authenticating with OAuth 2.0. It is the default method for the Snyk IDE plugins, and its tokens are not static. Use token authentication only where OAuth 2.0 is not available to you.
{% endhint %}
{% hint style="warning" %}
The Personal Access Token (PAT) authentication is progressively rolled out to all Enterprise customers. To check if this feature is available for your Organization at this time, please reach out to your Snyk account team.
{% endhint %}
To authenticate using the Personal Access token, follow these steps:
1. Navigate to **Preferences** > **Snyk**.
2. Set the flag to **Use Personal Access Token**.
3. Click the **Connect IDE to Snyk** button.
4. Create your **Personal Access Token**. For details, see the [Authentication for API](/developer-tools/snyk-api/authentication-for-api.md) page.
5. Paste or enter the token in the **Token** field.
6. Click **Apply and Close**.
### Steps to authenticate using your Snyk API token
{% hint style="info" %}
Snyk recommends authenticating with OAuth 2.0. It is the default method for the Snyk IDE plugins, and its tokens are not static. Use token authentication only where OAuth 2.0 is not available to you.
{% endhint %}
Follow these steps to authenticate:
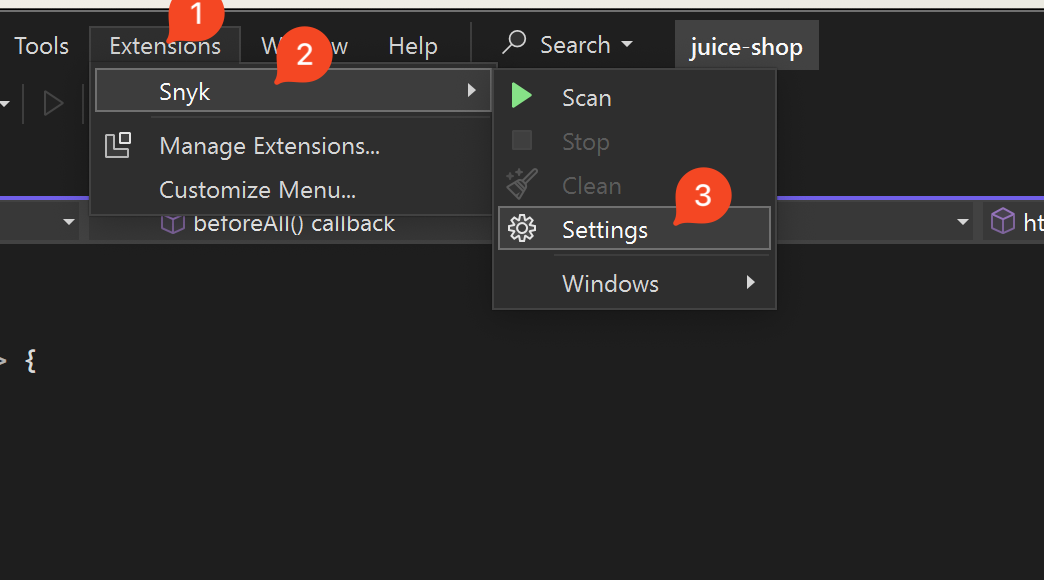
1. After the extension is installed, navigate to **Extensions** > **Snyk** > **Settings**:
Snyk Settings navigation
2. Find the **Authentication Method** and change it to **API Token** authentication.
3. Click the **Connect IDE to Snyk** button.
4. Click **Authenticate** in the web browser window that opens.
5. The API token is automatically updated in the **API Token field**.
6. Click **Apply and Close**.
The analysis starts automatically.
{% hint style="info" %}
Alternatively, copy the personal API token from your Snyk Web UI instance (default is [https://app.snyk.io](https://app.snyk.io/)). Paste the token in the **API Token** field. For details, see [Obtain and use your Snyk API token](https://docs.snyk.io/getting-started-guides/getting-started#obtain-and-use-your-snyk-api-token).
{% endhint %}
### How to switch accounts
To re-authenticate with a different account, follow these steps:
1. Navigate to **Extensions** > **Snyk** > **Settings**.
2. Clear the value of the **Token** field.
3. Click **OK**.
4. When you have logged out, start authentication again from the beginning.
---
# Agent Instructions
This documentation is published with GitBook. GitBook is the documentation platform designed so that both humans and AI agents can read, navigate, and reason over technical content effectively. Learn more at gitbook.com.
## Querying This Documentation
If you need additional information that is not directly available in this page, you can query the documentation by asking a question.
Perform an HTTP GET request on the following URL with the `ask` and `goal` query parameters:
```
GET https://docs.snyk.io/developer-tools/integrations/snyk-ide-plugins-and-extensions/visual-studio-extension/authentication-for-visual-studio-extension.md?ask=&goal=
```
`ask` is the immediate question: it should be specific, self-contained, and written in natural language.
`goal` is what the user is ultimately trying to achieve, the reason they need the answer. Sharing it helps GitBook give you a better, more relevant answer. A goal is most helpful when it describes the outcome the user wants rather than restating the question. For example, with `ask=how do I create an API token`, a goal like `automate deployments from our CI pipeline` lets GitBook tailor the answer to that use case.
The response will contain a direct answer to the question and relevant excerpts and sources from the documentation.
Use this mechanism when the answer is not explicitly present in the current page, you need clarification or additional context, or you want to retrieve related documentation sections.
.png?alt=media)
.png?alt=media)
.png?alt=media)
.png?alt=media)