> For the complete documentation index, see [llms.txt](https://docs.snyk.io/llms.txt). Markdown versions of documentation pages are available by appending `.md` to page URLs; this page is available as [Markdown](https://docs.snyk.io/scan-fix-and-prevent/scan-with-snyk/snyk-code/rule-extensions/configure-rule-extensions.md).
# Configure Rule Extensions
How to configure Snyk Code Rule Extensions from the Group settings in the Snyk Web UI
{% hint style="info" %}
**Snyk is rolling out a new navigation.** The steps on this page describe the classic interface. If your view looks different, visit [Navigate the Snyk Web UI](https://docs.snyk.io/navigate-the-snyk-web-ui#where-things-moved) to map these options to the new interface.
{% endhint %}
## Configure Rule Extensions
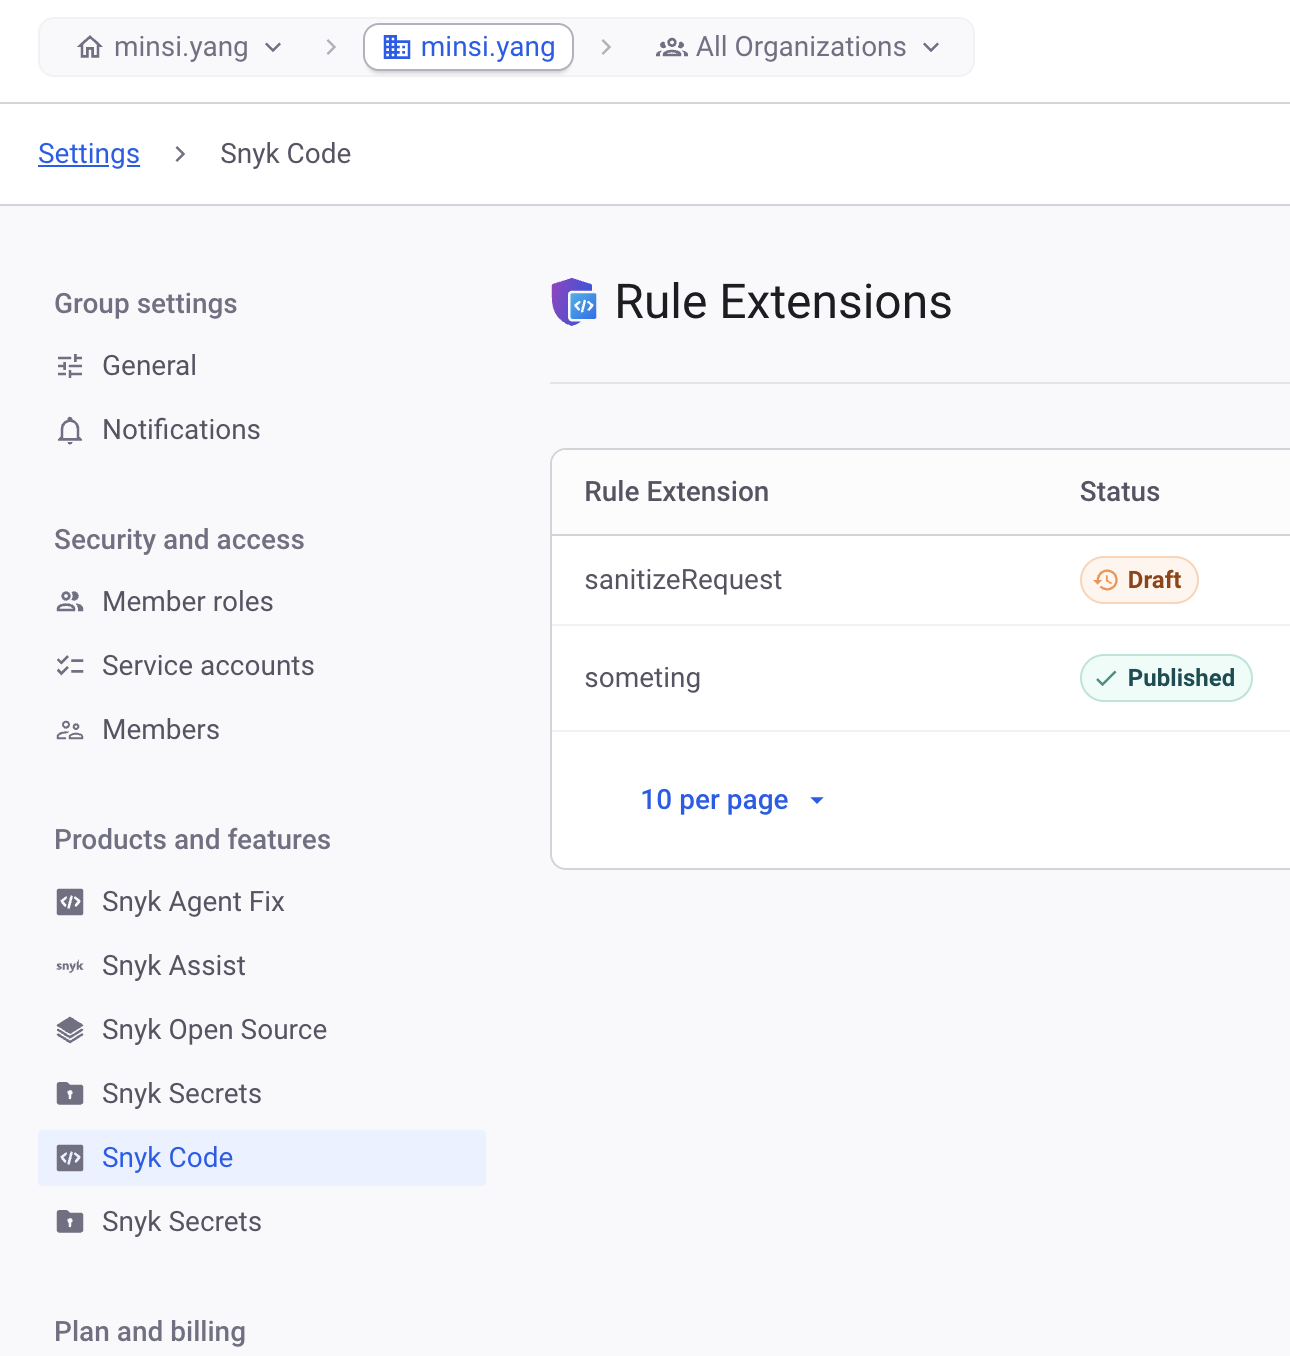
Rule Extensions are managed at the **Group** level in the Snyk Web UI, under **Group settings → Snyk Code**. You need the [UI access permissions](/scan-fix-and-prevent/scan-with-snyk/snyk-code/rule-extensions/rule-extensions-permissions.md#permissions-for-ui-access) to reach these screens.
Rule Extensions in Group settings → Snyk Code
### Create a Rule Extension
Add a custom sanitizer to an existing Snyk Code rule.
1. Log in to the Snyk Web UI and select your [Group](https://docs.snyk.io/snyk-admin/groups-and-organizations).
2. Navigate to **Group settings → Snyk Code → Rule Extensions**.
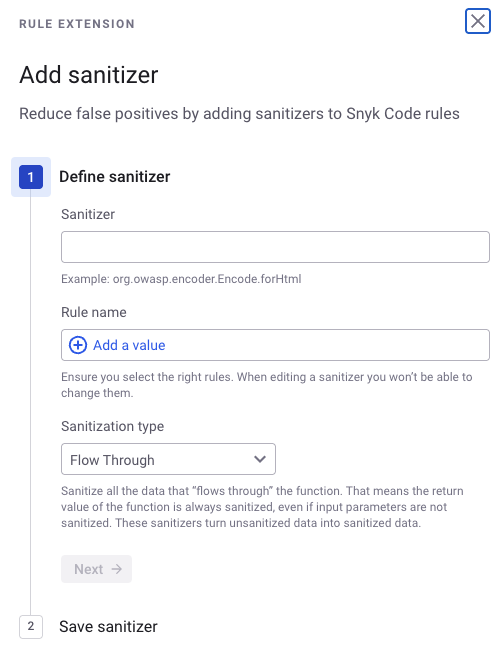
3. Click **Create sanitizer** and define the functional attributes:
1. **Sanitizer**: Provide the fully qualified name (FQN). Need help identifying your FQN? See the [FQN identification guide](/scan-fix-and-prevent/scan-with-snyk/snyk-code/rule-extensions/identify-your-sanitizers-fqn.md).
2. **Rule key**: Select one or more rules you want this extension to apply to. This is the rule key specified on the [Supported rules](/scan-fix-and-prevent/scan-with-snyk/snyk-code/rule-extensions/supported-rules.md) page.
3. **Sanitization type**: Select one of the four ways your function sanitizes data. For more details, see [Custom sanitizers](/scan-fix-and-prevent/scan-with-snyk/snyk-code/rule-extensions/custom-sanitizers.md).
Add sanitizer as a rule extension in Snyk Code
4. Define the rule extension outline attributes:
1. **Scope**: Choose whether to apply the rule extension to the entire Group or to a subset of Organizations within the Group.
2. **Description** (Optional): Add a short description of what the rule extension does.
3. **Status**: Specifies how the rule extension is treated after you save it:
* **Published**: The rule extension is live; Snyk applies it starting with the next test.
* **Draft**: Snyk excludes the Rule Extension from tests after you save it. Use this when collaborating with others for review. Once review is complete, change the status to publish it.
5. Click **Save**.
### Update a Rule Extension
You can update attributes such as sanitization type, scope, description, or status. The sanitizer, the rule selections, and the Rule Extension name are not editable.
1. Log in to the Snyk Web UI and select your [Group](https://docs.snyk.io/snyk-admin/groups-and-organizations).
2. Navigate to **Rule Extensions**.
3. Select the horizontal ellipsis and then select **Edit**.
4. Click **Save**.
### Delete a Rule Extension
After you delete a Rule Extension, tests no longer pick it up.
1. Log in to the Snyk Web UI and select your [Group](https://docs.snyk.io/snyk-admin/groups-and-organizations).
2. Navigate to **Rule Extensions**.
3. Select the horizontal ellipsis and then select **Delete**.
4. Confirm the deletion.
---
# Agent Instructions
This documentation is published with GitBook. GitBook is the documentation platform designed so that both humans and AI agents can read, navigate, and reason over technical content effectively. Learn more at gitbook.com.
## Querying This Documentation
If you need additional information that is not directly available in this page, you can query the documentation by asking a question.
Perform an HTTP GET request on the following URL with the `ask` and `goal` query parameters:
```
GET https://docs.snyk.io/scan-fix-and-prevent/scan-with-snyk/snyk-code/rule-extensions/configure-rule-extensions.md?ask=&goal=
```
`ask` is the immediate question: it should be specific, self-contained, and written in natural language.
`goal` is what the user is ultimately trying to achieve, the reason they need the answer. Sharing it helps GitBook give you a better, more relevant answer. A goal is most helpful when it describes the outcome the user wants rather than restating the question. For example, with `ask=how do I create an API token`, a goal like `automate deployments from our CI pipeline` lets GitBook tailor the answer to that use case.
The response will contain a direct answer to the question and relevant excerpts and sources from the documentation.
Use this mechanism when the answer is not explicitly present in the current page, you need clarification or additional context, or you want to retrieve related documentation sections.